Swiftが3系から4系に上がる現時点での各種パッケージマネージャを比較
Swiftが3系から4系に上がる現時点での各種パッケージマネージャを比較
iOS11が発表されXcode 9 betaをダウンロードでき、公式でSwift4.0が目前の中ついこの間にSwift.orgからマイグレーションガイドの項目が追加されていました。
Swift.org - Migrating to Swift 4
ここによるとSwift3.2、またはSwift4.0でのライブラリ配布でない場合はソースコードから直接依存させた方が良いとあります。
というのもSwift3.2からSwift4.0は互換性はあるのですが、Swift3.1以前は互換性が無いとのこと。
またSwift周りの環境が変わってきそうな中でライブラリ管理で使えるパッケージマネージャの予習・復習がてらに比較してみました。
iOS / macOSから始まりOSSになったSwiftですが、パッケージマネージャとして有名なのは以下3種類になります。
- CocoaPods
- Carthage
- Swift Package Manager
それぞれ用途ごとに3つを比較しながら詳解していきます。
前提
- Swift 4.0
- Apple Swift version 4.0 (swiftlang-900.0.43 clang-900.0.22.8)
- Xcode 9 beta 2
- coocapods 1.3.0.beta.2
- carthage 0.23.0
ソースコードの公開先
Swiftの各種パッケージマネージャは全てOSSとして公開されていて、GitHubからソースコードを確認することができます。
CocoaPods
Rubyで実装されていて、そのためかCocoaPods自体もRubyGemsの文化がそのまま引き継がれた形式になっています。
CocoaPods専用の巨大なリポジトリが存在しており、そこから指定のライブラリを取得してくる流れになっています。
Carthage
Swiftで実装されており、CocoaPodsが中央集権型のパッケージマネージャならCarthageは対照的でよりシンプルにライブラリを提供するためにGit経由でライブラリを導入します。
Swift Package Manager
Swift自体に内包されている言語として公式のパッケージマネージャになり、仕組み的にはCarthageに近くGit経由でライブラリを導入します。
他のパッケージマネージャとして違う点はiOS / macOSなどのAppleのプラットフォームには対応しておらずLinuxのみに対応しているのが大きな違いになります。
導入
CocoaPods
$ gem install cocoapods
gemからインストールします、gemの依存性を気にして間にbundlerを入れて管理するパターンも多いです。
(bundlerについては割愛)
Carthage
HomeBrew
$ brew install carthage
HomeBrewからインストールできます、他の方法だと.pkgを公開しているのでこちらからもインストールできます。
Swift Package Manager
Swift Package ManagerはSwift公式のパッケージマネージャとして言語自体に内包されているため特に導入の手順なくとも、Swiftの環境があれば使うことができます。
提供側のパッケージファイル
CocoaPods
{ライブラリ名}.podspec
https://guides.cocoapods.org/syntax/podspec.html
Pod::Spec.new do |spec|
  spec.name         = '{ライブラリ名}'
  spec.version      = '{Semantic Versioningなgit tag}'
  spec.license      = { :type => '{ライセンス形式}' }
  spec.homepage     = '{ライブラリのホームページURL}'
  spec.authors      = { '{作成名}' => '作成者のメールアドレス' }
  spec.summary      = '{ライブラリの概要}'
  spec.source       = { :git => '{ソースコードのURL}', :tag => '#{spec.version}' }
  spec.source_files = '{ライブラリのディレクトリ内でソースコードのパスを指定}' # Sourcesの下にあるコードを指定する場合はこうなる 'Sources/**/*.{swift,h,m}'
  spec.dependency = '{依存するライブラリ名}' # 複数ある場合は続けて 'spec.dependency = ...' と複数行に分けて書く
  spec.ios.deployment_target = "{対応してる中で最低なiOS version}"
  spec.osx.deployment_target = "{対応してる中で最低なmacOS version}"
  if spec.respond_to?(:watchos)
    spec.watchos.deployment_target = "{対応してる中で最低なwatchOS version}"
  end
  if spec.respond_to?(:tvos)
    spec.tvos.deployment_target = "{対応してる中で最低なtvOS version}"
  end
end
あとはここに記載したライブラリ名でCocoaPods側に登録をすることで
pod '{ライブラリ名}'
でCocoaPodsからライブラリを利用することができるようになります。
CocoaPods側に登録しない場合は直接GitのURLを指定することでライブラリを入れることができます。
Carthage
Swiftのdynamic libraryの仕組みを利用した配布方法を取るため提供側のパッケージファイルはありません。
なので配布する条件としては、
- ライブラリのリポジトリのrootに
{ライブラリ名}.xcprojectを用意する - dynamic framework用のスキームを用意する
- Semantic Versioningのフォーマットに沿ったgit tagを打っておく
上記を満たしていることでライブラリ利用側からCarthageを経由してライブラリを導入することができます。
Swift Package Manager
Swift Package Managerはライブラリの提供側も利用側も同じフォーマットで扱うことができます。
提供側のリポジトリのルートにPackage.swiftがあれば利用側はライブラリをSwift Package Manager経由で利用することが可能になります。
利用側のパッケージファイル
どのパッケージマネージャもパッケージング用のファイルと、その依存を固定するためのロックファイルがペアで存在しています。
それぞれ表でまとめたものがこちら
| パッケージマネージャ | CocoaPods | Carthage | Swift Package Manager |
|---|---|---|---|
| パッケージファイル | Podfile | Cartfile | Package.swift |
| ロックファイル | Podfile.lock | Cartfile.resolved | Package.pins |
それでは実際にライブラリを導入する際にどう記載していくのかを試します。
ここでは一般的によく使われる通信用のライブラリであるAlamofireのSwift4対応branch導入を例にしていきます。
CocoaPods
Podfile
target 'SampleProject' do
  # Comment the next line if you're not using Swift and don't want to use dynamic frameworks
  use_frameworks!

  # Pods for SampleProject
  pod 'Alamofire/Alamofire', :git => 'https://github.com/Alamofire/Alamofire', :branch => 'swift4'

  target 'SampleProjectTests' do
    inherit! :search_paths
    # Pods for testing
  end
end
Carthage
https://github.com/Carthage/Carthage/blob/master/Documentation/Artifacts.md#cartfile
Cartfile
github 'Alamofire/Alamofire' 'swift4'
Swift Package Manager
Package.swift
// swift-tools-version:4.0
// The swift-tools-version declares the minimum version of Swift required to build this package.


import PackageDescription

let package = Package(
    name: "SamplePackage",
    products: [
        // Products define the executables and libraries produced by a package, and make them visible to other packages.
        .library(
            name: "SamplePackage",
            targets: ["SamplePackage"]),
    ],
    dependencies: [
        // Dependencies declare other packages that this package depends on.
        .package(url: "https://github.com/Alamofire/Alamofire.git", .branch("swift4"))
    ],
    targets: [
        // Targets are the basic building blocks of a package. A target can define a module or a test suite.
        // Targets can depend on other targets in this package, and on products in packages which this package depends on.
        .target(
            name: "SamplePackage",
            dependencies: ["Alamofire"]),
        .testTarget(
            name: "SamplePackageTests",
            dependencies: ["SamplePackage"]),
    ]
)
Swift4.0からSwift Package Managerのフォーマットが変わりました、従来のPackage.swiftと違う部分として新たにtargetsとproductsが増えています。
上記はswift package initのコマンドで生成したPackage.swiftを編集しています。
もし古いPackage.swiftも使いつつSwift4.0のPackage.swiftにも対応する場合は古いPackage.swiftには swift-tools-version の記述を行わず新しいPackage.swiftの名前を
Package@swift-4.swiftの名前にすることでSwift3.2以前のSwiftでもそのパッケージを利用することが可能になります。
コマンド比較
一般的に使うであろうコメントでそれぞれ比較して見ました。
こうしてみるとCocoaPodsは1つのbranchで管理してるのもあり割とコマンドが充実してます。
| 操作 | CocoaPods | Carthage | Swift Package Manager |
|---|---|---|---|
| 基本コマンド | pod | carthage | swift package |
| インストール | pod install | carthage bootstrap | swift package resolve |
| アップデート確認 | pod outdated | carthage outdated | - |
| アップデート | pod update | carthage update | swift package update |
| パッケージの表示 | - | - | swift package show-dependencies |
| パッケージの検索 | pod search | - | - |
| 利用可能なパッケージの表示 | pod list | - | - |
| リセット | pod deintegrate | - | swift package reset |
終わりに
段々とSwiftの環境が充実していくことが実感できますね、最近は3種のパッケージマネージャに対応してるライブラリもよく見ます。
Swift Package ManagerがAppleのプラットフォームに対応すればまた情勢が変わりそうですが、それぞれのプロジェクト用途に合わせて選択できたら良いですね。
Swift gybの環境構築
Swift gybの環境構築
ふとSwiftのgybが気になったので環境構築を試して見ました
gybとは
Swift言語開発の副産物のメタプログラミングツールgybがとても良い
— おもちメタル (@omochimetaru) 2017年6月30日
gybは「Generate Your Boilerplate」の略称みたいです(gyb --helpより)
具体的に何かと言うと、Swiftの公式リポジトリの中でSwiftコードの自動生成に使われているPython製のテンプレートエンジンになります
gybを導入する
というわけで、こちらを参考に環境構築して見ました
まずgyb自体はapple/swiftの/utils/の中にそのまま入っています
Qiitaの紹介記事ままですがcurlでgybファイルを取得していきます
mkdir gyb
curl "https://raw.githubusercontent.com/apple/swift/master/utils/gyb.py" -o "gyb/gyb.py"
curl "https://raw.githubusercontent.com/apple/swift/master/utils/gyb" -o "gyb/gyb"
chmod +x gyb/gyb
上記のshellをそのまま実行すればgybを動かすのに必要なファイルが揃います
実際に動くかどうか確認します
$ cd gyb
$ ./gyb --help
これでhelpの一覧が出れば成功です
usage: gyb [-h] [-D NAME=VALUE] [-o TARGET] [--test] [--verbose-test] [--dump]
           [--line-directive LINE_DIRECTIVE]
           [file]

Generate Your Boilerplate!

positional arguments:
  file                  Path to GYB template file (defaults to stdin)

optional arguments:
  -h, --help            show this help message and exit
  -D NAME=VALUE         Bindings to be set in the template's execution context
  -o TARGET             Output file (defaults to stdout)
  --test                Run a self-test
  --verbose-test        Run a verbose self-test
  --dump                Dump the parsed template to stdout
  --line-directive LINE_DIRECTIVE
                        Line directive prefix; empty => no line markers

    A GYB template consists of the following elements:

      - Literal text which is inserted directly into the output

      - %% or $$ in literal text, which insert literal '%' and '$'
        symbols respectively.

      - Substitutions of the form ${<python-expression>}.  The Python
        expression is converted to a string and the result is inserted
        into the output.

      - Python code delimited by %{...}%.  Typically used to inject
        definitions (functions, classes, variable bindings) into the
        evaluation context of the template.  Common indentation is
        stripped, so you can add as much indentation to the beginning
        of this code as you like

      - Lines beginning with optional whitespace followed by a single
        '%' and Python code.  %-lines allow you to nest other
        constructs inside them.  To close a level of nesting, use the
        "%end" construct.

      - Lines beginning with optional whitespace and followed by a
        single '%' and the token "end", which close open constructs in
        %-lines.

    Example template:

          - Hello -
        %{
             x = 42
             def succ(a):
                 return a+1
        }%

        I can assure you that ${x} < ${succ(x)}

        % if int(y) > 7:
        %    for i in range(3):
        y is greater than seven!
        %    end
        % else:
        y is less than or equal to seven
        % end

          - The End. -

    When run with "gyb -Dy=9", the output is

          - Hello -

        I can assure you that 42 < 43

        y is greater than seven!
        y is greater than seven!
        y is greater than seven!

          - The End. -
gybの使い方
ヘルプ
$ ./gyb --help
もしくは
$ ./gyb -h
テンプレートをコンソール上に出力
下記コマンドからgyb形式のテンプレートを元に出力を行えます
注意点として--line-directive=のオプションを追加しない場合は// ###sourceLocationというgyb側がSwiftコンパイラの為に出力するコメントも一緒に出力されてしまうので見た目的にも追加した方が良いです
$ ./gyb {gyb_file} --line-directive=
Int/UIntの全てのビットの型に対して最大値を返す関数を追加
テンプレートがこちら
template.swift.gyb
%{
  intTypes = [8,16,32,64]
}%

% for intType in intTypes:
    % for sign in ['','U']:

/// Extension that adds a few additional functionalities to ${sign}Int${intType}
extension ${sign}Int${intType} {

    /// Returns a ${sign}Int${intType} with all ones
        %if sign == '':
    public static var allOnes:Int${intType} {
       return Int${intType}(bitPattern: UInt${intType}.max)
    }
        %else:
    public static var allOnes:UInt${intType} {
       return UInt${intType}.max
    }
        %end
}
    %end
%end
出力してみます、下記コマンドを叩いて見ます
$ ./gyb template.swift.gyb --line-directive=
これでInt / UIntの8から64ビットの型に対してextensionするコードが生成されてるのが確認できれば成功です
/// Extension that adds a few additional functionalities to Int8
extension Int8 {

    /// Returns a Int8 with all ones
    public static var allOnes:Int8 {
       return Int8(bitPattern: UInt8.max)
    }
}

/// Extension that adds a few additional functionalities to UInt8
extension UInt8 {

    /// Returns a UInt8 with all ones
    public static var allOnes:UInt8 {
       return UInt8.max
    }
}

/// Extension that adds a few additional functionalities to Int16
extension Int16 {

    /// Returns a Int16 with all ones
    public static var allOnes:Int16 {
       return Int16(bitPattern: UInt16.max)
    }
}

/// Extension that adds a few additional functionalities to UInt16
extension UInt16 {

    /// Returns a UInt16 with all ones
    public static var allOnes:UInt16 {
       return UInt16.max
    }
}

/// Extension that adds a few additional functionalities to Int32
extension Int32 {

    /// Returns a Int32 with all ones
    public static var allOnes:Int32 {
       return Int32(bitPattern: UInt32.max)
    }
}

/// Extension that adds a few additional functionalities to UInt32
extension UInt32 {

    /// Returns a UInt32 with all ones
    public static var allOnes:UInt32 {
       return UInt32.max
    }
}

/// Extension that adds a few additional functionalities to Int64
extension Int64 {

    /// Returns a Int64 with all ones
    public static var allOnes:Int64 {
       return Int64(bitPattern: UInt64.max)
    }
}

/// Extension that adds a few additional functionalities to UInt64
extension UInt64 {

    /// Returns a UInt64 with all ones
    public static var allOnes:UInt64 {
       return UInt64.max
    }
}
あと例えばファイル内のgybファイルを一気に出力するような場合はomochiさんがこういうスクリプトを書いてくれてたりするので参考にすると良いかもしれません
終わりに
こんな感じで書くことが決まってるのに型の都合で書かないといけないコードだったりが、gybを使うことで人間が手を動かす量が減るのは最高ですね
まだ使い始めたばっかりなのでなんともですけど、swagger.ymlからAPI定義を元にgyb経由して自動でモデル定義吐けたりとかが理想です、どんどん楽していきたい…(切実)
rustupでRustを導入してみる
rustupでRustを導入してみる
前の記事でrsvmの導入についての記事を書いたが、公式的にはrustupを使うことを推奨しているようなので試してみた
導入
Rustのページで書かれてるようにコマンドを叩いてみる
$ curl https://sh.rustup.rs -sSf | sh
すると、どのオプションでインストールを実行するのかを確認されるのでとりあえずdefaultを選択してみる
Current installation options:

   default host triple: x86_64-apple-darwin
     default toolchain: stable
  modify PATH variable: yes

1) Proceed with installation (default)
2) Customize installation
3) Cancel installation
インストールが実行される
info: syncing channel updates for 'stable-x86_64-apple-darwin'
info: downloading component 'rustc'
 31.5 MiB /  31.5 MiB (100 %)  23.0 MiB/s ETA:   0 s
info: downloading component 'rust-std'
 41.3 MiB /  41.3 MiB (100 %)  31.9 MiB/s ETA:   0 s
info: downloading component 'cargo'
  3.2 MiB /   3.2 MiB (100 %)   1.3 MiB/s ETA:   0 s
info: installing component 'rustc'
info: installing component 'rust-std'
info: installing component 'cargo'
info: default toolchain set to 'stable'

  stable installed - rustc 1.14.0 (e8a012324 2016-12-16)


Rust is installed now. Great!

To get started you need Cargo's bin directory in your PATH environment
variable. Next time you log in this will be done automatically.

To configure your current shell run source $HOME/.cargo/env
そして言われた通りに更新するようコマンドを叩く
$ source $HOME/.cargo/env
入ったかどうかバージョンを確認する
$ rustc -V
rustc 1.14.0 (e8a012324 2016-12-16)
現時点で最新のRustのバージョン1.14.0入った 👍
rsvmでRustのバージョン管理を試してみた
rsvmでRustのバージョン管理を試してみた
言語のバージョン管理でいう〜env系のRust版があったので試して見た
環境
rsvmをインストールする
$ curl -L https://raw.github.com/sdepold/rsvm/master/install.sh | sh
これでパスも通ったはずなので更新して確認、試しにヘルプを出してみる
$ source .zshrc
$ rsvm -h
下記のように出てれば成功
Rust Version Manager
====================

Usage:

  rsvm help | --help | -h       Show this message.
  rsvm install <version>        Download and install a <version>.
                                <version> could be for example "0.12.0".
  rsvm uninstall <version>      Uninstall a <version>.
  rsvm use <version>            Activate <version> for now and the future.
  rsvm ls | list                List all installed versions of rust.
  rsvm ls-remote                List remote versions available for install.
  rsvm ls-channel               Print a channel version available for install.

Current version: 0.5.1
rsvmでrustを入れてみる
どのバージョンを入れて良いのか分からないのでRustのバージョンを確認する
$ rsvm ls-remote
現在の最新が1.14.0であることが分かるので指定してインストールする
rsvm install 1.14.0
以下のように表示されたら完了
Creating the respective folders for rust 1.14.0 ... done
Downloading sources for rust 1.14.0 ...
######################################################################## 100.0%
Extracting source ... done
Downloading sources for rustc sourcecode 1.14.0 ...
######################################################################## 100.0%
Extracting source ... install: creating uninstall script at /Users/moaible/.rsvm/versions/1.14.0/dist/lib/rustlib/uninstall.sh
install: installing component 'rustc'
install: installing component 'rust-std-x86_64-apple-darwin'
install: installing component 'rust-docs'
install: installing component 'cargo'

    Rust is ready to roll.


And we are done. Have fun using rust 1.14.0.
Activating rust 1.14.0 ... done
指定したバージョンがインストールされたかを確認
$ rsvm ls
rsvm_initialize:23: file exists: /Users/moaible/.rsvm/.rsvm_version
Installed versions:

  =>  1.14.0

$ rustc -V
rustc 1.14.0 (e8a012324 2016-12-16)
Rustのバージョンも反映されてることが分かる
疑問
他の〜env系と違ってlocalとglobalの切り替えができない模様、nvmとインターフェースが似てるのでどうにか解決できるかもしれない
終わりに
他の言語と同じようにRustでもバージョン管理することができたので、どんどんRustを追いかけていきたい
SwiftでCLIしやすくするモジュールSwCLIを作ってみた
SwiftでCLIしやすくするモジュールSwCLIを作ってみた
なぜ作ったか
- Xcode 8.0から
system関数をコールするとエラーになった - NSTaskで扱えるが癖を把握して使わないといけないため、いちいち面倒くさい
ということである程度wrapして扱えるようにしたライブラリを実装したので紹介します
実行
let ret = try! SwCLI().runWithRead(["echo", "abc"])
// -> abc
実行確認
if SwCLI().passes(["cd", "Sources"]) {
    // -> changed directory
}
コマンド確認
if SwCLI().contains(["git"]) {
    // -> can use git command
}
Assert
fail("forced termination")
終わりに
こんな感じで簡単に試せることを意識して実装してみました。
ぜひ触って見てください
Swift3.0-preview-1で追加されたswift packageを試してみた
Swift3.0-preview-1で追加されたswift packageを試してみた

3.0-preview-1-SNAPSHOT-2016-05-31-aのSwiftがリリースされ、このバージョンからswift packageコマンドが使えるようになりました。
これはSwift Package Managerを使用する際に利用するコマンドになります。この記事では環境構築、使い方を説明していきます。
Swift Package Managerの環境を構築する
SwiftのバージョンをSwift3.0-preview-1版に変更する
swift packageコマンドが使えるようになった3.0-preview-1-SNAPSHOT-2016-05-31-aのSwiftを使用します。
swift.orgからSwift3.0-preview-1版のsnapshotをダウンロードしてくる
上記からSwift3.0-preview-1版Swiftのsnapshotをダウンロードし、インストールしておきます。
swiftenvでSwiftのバージョンをSwift3.0-preview-1版に切り替える
今回はswiftenvを利用してSwiftのバージョンを変更します。
swiftenvは上記記事にてセットアップについて説明してますので参考にしてください。
swiftenv global 3.0-preview-1-SNAPSHOT-2016-05-31-a
これで設定してるSwiftが3.0-preview-1-SNAPSHOT-2016-05-31-aのバージョンに変更されました。
念のためにバージョンが変更されたか確認しておきましょう。
$ swift --version
Apple Swift version 3.0-dev (LLVM 3863c393d9, Clang d03752fe45, Swift e996f0c248)
Target: x86_64-apple-macosx10.9
$ swiftenv version
3.0-preview-1-SNAPSHOT-2016-05-31-a (set by /Users/__moai/.swiftenv/version)
ここでバージョンが切り替わっていれば成功です。
TOOLCHAINSにパスを通す
swift packageコマンドを利用するためにパスを通します。
OS、環境によって違うので、それに合わせて変更しましょう。
Xcode 7.2の場合
export PATH=/Library/Toolchains/swift-latest.xctoolchain/usr/bin:$PATH
Xcode 7.3の場合
export TOOLCHAINS=swift
Linuxの場合
export PATH=path/to/toolchain/usr/bin:$PATH
swift packageがの環境が構築できたか確認する
swift packageのコマンドが利用できるようになったかを確認します。
バージョンが表示されるかどうか以下のコマンドを叩いて確認しましょう。
$ swift package --version
Swift Package Manager – Swift 3.0
エラーが出る場合はSwiftのバージョン、pathの設定がおかしい可能性があるのでその辺りを調べてみると良いかもしれません。
Swift Package Managerを試してみる
それではswift packageコマンドを試していきましょう。
swift packageコマンドを叩いてみます。
$ swift package
OVERVIEW: Perform operations on Swift packages

USAGE: swift package [command] [options]

COMMANDS:
  init [--type <type>]                   Initialize package (library|executable)
  fetch                                  Fetch package dependencies
  update                                 Update package dependencies
  generate-xcodeproj [--output <path>]   Generates an Xcode project
  show-dependencies [--format <format>]  Print dependency graph (text|dot|json)
  dump-package [--output <path>]         Print Package.swift as JSON

OPTIONS:
  -C, --chdir <path>        Change working directory before any other operation
  --color <mode>            Specify color mode (auto|always|never)
  -v, --verbose             Increase verbosity of informational output
  --version                 Print the Swift Package Manager version
  -Xcc <flag>               Pass flag through to all C compiler invocations
  -Xlinker <flag>           Pass flag through to all linker invocations
  -Xswiftc <flag>           Pass flag through to all Swift compiler invocations

NOTE: Use `swift build` to build packages, and `swift test` to test packages
上記のように使い方が出力されてますね。
swift packageから雛形を作る
Hogeディレクトリを作成して0の状態からPckageの雛形を作成します。
雛形を作成するときにはswift package initコマンドを叩きます。
mkdir Hoge
cd Hoge
swift package init
すると、下記のログが出力され雛形が生成されます。
Creating library package: Hoge
Creating Package.swift
Creating .gitignore
Creating Sources/
Creating Sources/Hoge.swift
Creating Tests/
Creating Tests/LinuxMain.swift
Creating Tests/Hoge/
Creating Tests/Hoge/HogeTests.swift
それでは自動生成されたファイルの中身を見ていきましょう。
Package.swift
親ディレクトリ名をそのままPackage名として定義しています。
import PackageDescription

let package = Package(
    name: "Hoge"
)
.gitignore
ビルドによる成果物、依存してるPackage群、Xcodeプロジェクトファイルなどがignoreとしたいファイルのようです。
.DS_Store
/.build
/Packages
/*.xcodeproj
Sources/Hoge.swift
親ディレクトリ名の構造体が定義されており、textのプロパティにはHello, World!が値として入っています。
雛形的にrootの構造体としてここからライブラリにアクセスさせたい意図があるようにも思えます。
struct Hoge {

    var text = "Hello, World!"
}
Tests/LinuxMain.swift
Tests/LinuxMain.swiftがテストの際に最初に呼ばれるファイルになります。
ここではターゲットとなるTestの全クラスをXCTMainに渡して教えてあげています。
import XCTest
@testable import HogeTestSuite

XCTMain([
     testCase(HogeTests.allTests),
])
Tests/Hoge/HogeTests.swift
自動生成するHoge構造体が保持してるtextの中身をテストしています。
先ほどのTests/LinuxMain.swiftで見たようにallTestsとしてTestする内容の一覧を返すようにしています。
import XCTest
@testable import Hoge

class HogeTests: XCTestCase {
    func testExample() {
        // This is an example of a functional test case.
        // Use XCTAssert and related functions to verify your tests produce the correct results.
        XCTAssertEqual(Hoge().text, "Hello, World!")
    }


    static var allTests : [(String, (HogeTests) -> () throws -> Void)] {
        return [
            ("testExample", testExample),
        ]
    }
}
swift packageからXcodeのプロジェクトファイルを生成する
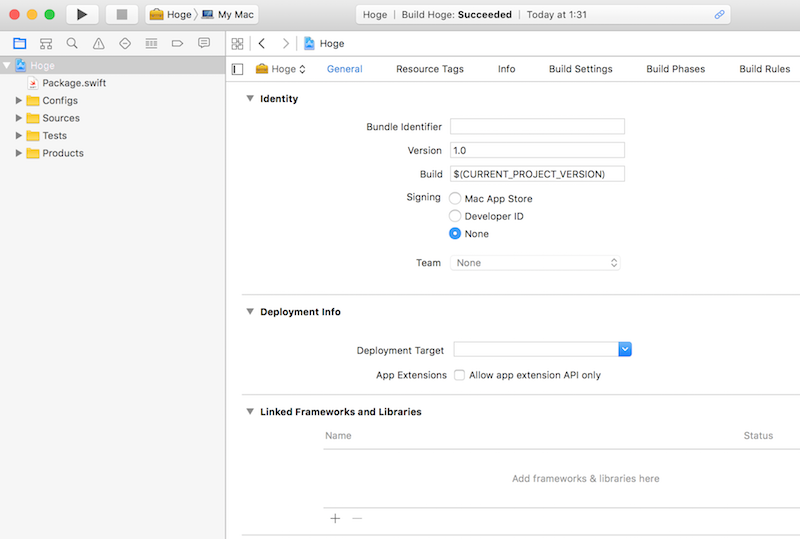
Hogeディレクトリで自動生成したファイルを元にXcodeのプロジェクトファイルを生成します。
swift package generate-xcodeproj
すると下記ログが出力されプロジェクトファイルが生成されます。
generated: ./Hoge.xcodeproj
早速Xcodeで開いてみましょう。

自動でコードがプロジェクトファイルに紐付けされた状態になっていますね。
このようにswift packageコマンドを使えばSwiftのコーディングに集中することができます。
どんどんSwiftで良いコードを書いていきましょう。